Saturday, March 14, 2009

North American Find Forecast: March 2009

The Christmas, Mardi Gras, and Valentine’s day holiday inventories are fading; while St. Patrick’s day, Easter and Prom season are on the rise. Spring is dawning here in the US, and here is your “forecast” for what you may find and convert to belly dance use in a store near you.


Red items: carry over from Valentine’s Day, and some Christmas. Price and availability are trending down. Look for: fabrics, jewelry, heart items that may embellish (think: appliqués, sequins, things that can be cut up and sewn on). Location: a clearance rack near you.

Emerald Greens: Some Christmas residuals may be out there, some Mardi Gras, but St. Patrick’s items are more likely. Prices will plummet, along with availability after March 17th. Look for: fabrics, some jewelry, embellishments will mostly be of bead variety. (No one really got into Mardi Gras around here this year due to the recession, so there may be beads aplenty.) Also, may find Purples and Golds. Location: a clearance rack near you.

Pastels: Easter and Prom are converging. Availability will rise over the next few weeks; prices will not drop until mid April. Look for: fabrics (satin, chiffon, silks), complimentary jewelry, and some convertible scarves (related posts coming soon). Embellishments may be in the form of appliqués, sequins, and brooches. Keep an eye out for shoes and sandals (again, related posts coming soon). Location: front of the store, where the “in season” items are kept.

Thrift store report: Some post-holiday and winter clearance on Red, Greens, and velvets. Remember, most thrift stores discount after 4 to 6 weeks in inventory, so seasonal finds are not as common as discounts based on time-in-inventory. Trending high on pre-Prom and pre-Easter (both price and availability). Also, continue to look for belly dance friendly items from years past: bohemian skirts, shirts with Beledi sleeves, embellished tanks -- these items will continue to surface over time; but, availability will always be “target of opportunity” due to the dependence on donations.

*This post title was edited on 3/18/09, as it really applies to North American seasons. Some holidays may be celebrated internationally, so you may be able follow those leads if you are one of my international readers. Feel free to comment if you have thoughts on this matter.

Wednesday, March 4, 2009

Street Skirts Hit the Stage

Isn’t it interesting how everything is more expensive when it’s “for bellydance?” By that, I mean that a simple tiered skirt hangs forlorn on a department store rack at some big-box discount store with a price tag less than $20US, while its not so distant cousin sits packed in a vendor’s truck, waiting to be displayed at an upcoming workshop with a price tag that is 3 to 5 times higher . . .


Folks, skirts are skirts. There are some that are elaborate enough to warrant vendor prices; and, you will not find those out in the wild. But, if you know what to look for, and where to look, you can buy performance worthy gems at clearance rack (“I never met a clearance rack I didn’t like!”) prices. Here is how.

Buy it to fit how you will wear it. That is, street skirts tend to be worn on the waist, and rarely fall below mid-calf; performance skirts need to fall on the hip and extend to the ankle. When buying, try them on so that the “waist” falls at your hip – look to see if the hem falls deep enough to cover the ankle and watch for “hip bumps” in the side seams. (Some skirts are shaped to curve around your hips – that doesn’t quite work when you slide them down to “below the belt.”)

Think of the possibilities. A plain black velvet skirt with a swirl panel (some call it a petal panel) shape may only look ho-hum; stick on some sequin trim along the seams and you have a bit of pizzazz! (FYI, slide the skirt over a piece of cardboard – I used my folded up cutting board. It will keep you from accidentally sewing the front to the back.)


When you get it home, try it on – with your costumes! I literally have “dress up parties” with my young daughter where we see which of Mommy’s pieces work with her new finds. And, when you buy skirts retail (vs. from dance vendors), you can often leverage a return policy.


Buy what you will ACTUALLY wear. I have a pink cotton full skirt with cute little shisha mirrors sewn on that seemed like a great idea at the time. I only wore it to class twice. I’m just not that tribal, I guess.

Basic Bedlah / Beledi Dress Storage

Your costume is an investment – normally, several hundred dollars (in $US, at least). Here are a few basic tips to help protect that investment:

1) Store them flat – do not hang. Beads have weight, and weight stretches fabrics. A dress that fits perfectly when you buy it can mysteriously grow 3 inches while hanging. Unless you really enjoy altering beaded hems, don’t hang it.
2) Store them in a protective environment – ideally, an acid free box. My personal preference is an acid free photo box. I am lucky in that I am small busted, so a photo box that sells for about $3.50US (on sale) can hold at least one half (top or bottom) of a bedlah; some beledi dresses fit in there as well. Larger boxes can be had at higher prices.
a. Why acid free? Acid eats fabric. ‘nuff said?
b. How do I fold them? Let the shape of your costume guide you: fold the belt to follow the curves of your hips. Gently place them in (fringe first), then ease the rest of the belt in.
c. How big of a box do I need? I base it on my bras – the box should be wide enough that my bra can easily fit with the cups up (i.e. the box needs to be about as wide as your shoulders.
d. They don’t make boxes big enough – what do I do?!? (AND) I really don’t want to spend money – what are my other options? Men’s shoe boxes and boot boxes (men’s or women’s) are a wonderful, larger, and often free alternative.
3) Throw in a little extra insurance – remember, Silica Gel is your new best friend!
4) Take the container with you when you perform. I tuck mine in a bag along with my change of clothes. This allows me to tuck my costume away in its protective shell after I do my quick change, protecting the beads and sequins from the ravages of transport. And, I keep a small zip-top bag in the box to hold jewelry. (Learned that one when a necklace “married” the fringe of a bra after one show.) Just remember to let your costume air a bit before tucking away for long-term storage.

Friday, February 27, 2009

Harem Pant conversion

There are some things I am willing to splurge on: a well beaded bra and belt, a good silk veil, a beledi dress that is a “one-step costume.” But, harem pants do not fall on that list. Here is how I made a pair for about $6US and some tips so you can, too.

When shopping, start at a thrift store or clearance rack. (“I never met a clearance rack I did not like!”) Then:

1) Look for the for a pair of loose fitting, elastic waist pants in a material that breathes and a color that is USEFUL to your wardrobe. Washable fabrics are even better. I was very lucky and found this pair of black rayon “beach pants” for $4.99US at the local Good---- store.

2) Bring or borrow a rubber band or pony tail tie. You will need it to try the pants on.
3) Check to see that the pants are at least 5 inches longer than you need. I am lucky, because I am short; so, this happens more often than not.
4) Also, be sure that the pants have a full leg to the ankle.
5) When you try the pants on, slip the rubber band / pony tail tie over your foot and use it to gather up the pants leg. This will let you see how the pants will look if you modify them. If you like the look, buy the pants; if not, keep looking.
6) There are two methods of converting these to harem pants:
a. NO SEW: When you need to wear them, slip the rubber band / pony tail tie over your foot and use it to gather up the pants leg. Betcha didn’t think it would be that easy, huh?
b. Some sewing: 1) cut a piece of elastic that is about .5 to 1 inch bigger than the circumference of your ankle. This allows room for overlap and keeps the cuff from being too tight. 2) stitch the ends of the elastic together. 3) turn the pants inside out. 4) slip the elastic band over the cuff of the pants. 5) fold the cuff of the pants over the band and stitch into place.
7) Save the money you spend for something more valuable to YOU!

Camisole conversion

If is one law about costuming, it would probably say, “You can spend money, or you can spend time.” Here is a sewing project for those of you with more of the latter.

Moderate sewing skills needed.
Estimated project time, 4 hours.
Estimated total cost: $20US

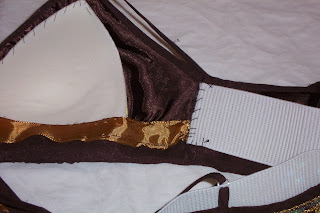
Start with one off-the-rack camisole. I found this one on a clearance rack (“I never met a clearance rack I didn’t like!”) for about $7US. This one featured an underbust seam and gathered cups, making bra conversion easy.

What it looked like when I started:


Steps for bra:
1) Carefully cut the camisole to follow a line one inch below the cups, so that you have enough fabric to fold up and under the bra line.
a. Note 1: It is better to cut further down (reducing the remaining fabric that can become your scarf or belt) than to skip on the bra. Trust me on this one.
b. Note 2: if your cami has two layers (mine was thin silk and slippery satin), it is a VERY good idea to pin or tack-stitch the layers together just below the line you will cut. This will keep them aligned when you make your skirt. Again, trust me on this one.
2) Since this cami was silk, I sewed some grosgrain ribbon along the raw edge of the fabric. (By the way, this is one way to recover if you cut too high in step one.)
3) Sew bra cups into the top if desired.
4) Fold the bottom edge of fabric up and under. Sew into place.

5) I wanted this bra top to fit tightly, so I added elastic along the back from side seam to side seam.

6) I then covered the elastic in craft felt. Any soft, non-fraying fabric that is sweat friendly will do.

7) Embellish as desired. Here, I made some tassels accented with sequins, I made some bows out of trim, and I covered the straps with the same trim.**

Steps for scarf / skirt:*
1) If you cami had two layers of fabric, align and pin or tack-stitch them together.
2) If desired, sew some grosgrain ribbon along the raw edge of the fabric.
3) Fold the top edge of the fabric over and under to make a hip band. Sew into place, adding elastic if you wish.

4) Embellish as desired.

Here is the finished product:


* You can also cover a belt if you have enough fabric and patience. I did not.
** There are those of you who will roll your eyes and say “Christmas trim, not AGAIN!” Please understand that this is not intended to be a “professional costume.” This is intended to be a costume for haflas or informal performances, made by those who are new to performing and who do have more time than money to spend on costumes.

Silica Gel is your new Best Friend


You have probably thrown away thousands of these little packs in your life; but you may never want to do that again. They come in boxes of shoes, with furniture, in new purses, even in medicines and some foods. And, their purpose is to KEEP THINGS DRY.

As a dancer, you have costumes and accessories that you want to protect from sweat, humidity, errant water bottles, etc. If you were to tuck one of these little marvels in the box where you store your bedlah (because, yes, you want to store it in a box – look for a future post on that topic), then it will silently protect your beautiful and expensive costume from damage. And, if you were to be sure you took a large one along when you perform, you can make those quick costume changes and just stow the costume with the packet (for a few hours at least) without worrying about damage from perspiration. My family is now trained to save every one they find, so that all of my costumes can be protected. I even keep one in my dance bag that I take to class – because ballet shoes can harbor moisture that can damage veils and hip scarves, too.

So, only follow half of the directions on the packet. “Do NOT EAT!” But, please do not throw them away!